Managing Tickets
Tickets are customer support requests that you receive through email or create manually in Helpdesk MX. The tickets section empowers you to efficiently manage and organize customer inquiries through the intuitive Ticket grid. With smart categorization and automation, you can easily track and prioritize tickets, ensuring that no issue is overlooked.
Dashboard
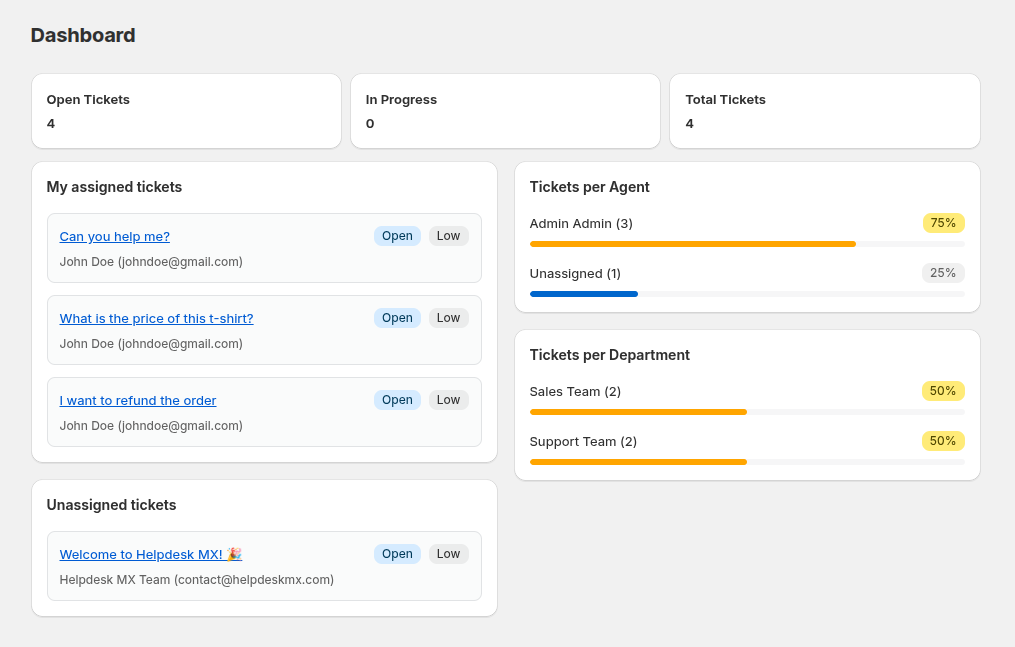
The Dashboard provides a quick overview of your Help Desk activity and team performance. It helps administrators and support agents track ticket flow, workload distribution, and pending issues in real time. To open dashboard navigate to Apps -> Helpdeks MX
Main Metrics
- Open Tickets – shows the number of currently open tickets.
- In Progress – displays tickets that are being handled by agents.
- Total Tickets – represents the total number of tickets in the system.
- Tickets per Agent - view how tickets are distributed among agents. If some tickets are unassigned, they will appear in this section under Unassigned
- My Assigned Tickets - displays all tickets assigned to the logged-in user. If no tickets are assigned, the section shows a message indicating an empty list.
- Tickets per Department - shows the number of tickets handled by each department.
- Unassigned Tickets - lists tickets that have not yet been assigned to any agent.
Viewing Your Tickets
Ticket List
Access your tickets from the main Tickets page. You'll see a list with:
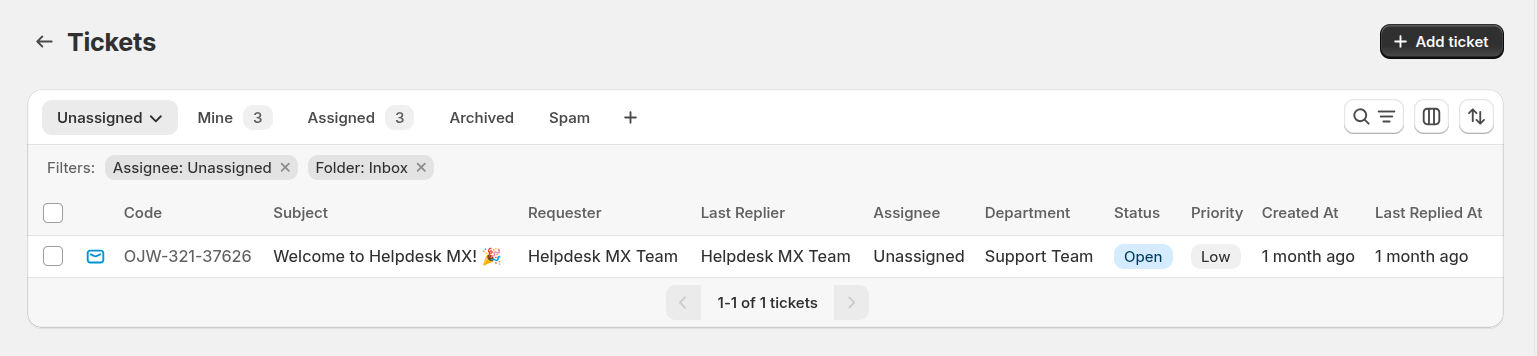
- Ticket Code - unique identifier (e.g., ABC-123-45678)
- Subject - ticket subject line
- Requester - customer who submitted the ticket
- Last Replier - who last responded
- Assignee - team member handling this ticket
- Department - department handling this ticket
- Status - current status (Open, In Progress, Closed)
- Priority - urgency level (Low, Medium, High)
- Created at - when the ticket was created
- Last Replied at - when the last reply was sent
Folders
Tickets grid is divided into three separate folders:
- Inbox - contains all active tickets.
- Archive - contains all archived tickets .
- Spam - contains all tickets, marked as spam.
Normally, tickets are sent to a proper folder automatically by two checks:
- If a ticket matches condition of workflow rules that changes the folder then the ticket is sent to the folder set in the rule;
- If a ticket's status is one that is defined in Helpdesk MX -> Settings -> General Settings -> Move Ticket to Archive if it has one of the following statuses, it will be sent to Archive.
Ticket Views
Switch between different views using the tabs at the top:
- My Tickets - tickets assigned to current user
- Unassigned - tickets waiting for someone to claim them
- Open - all active tickets
- Archived - closed and archived tickets
- Spam - tickets marked as spam
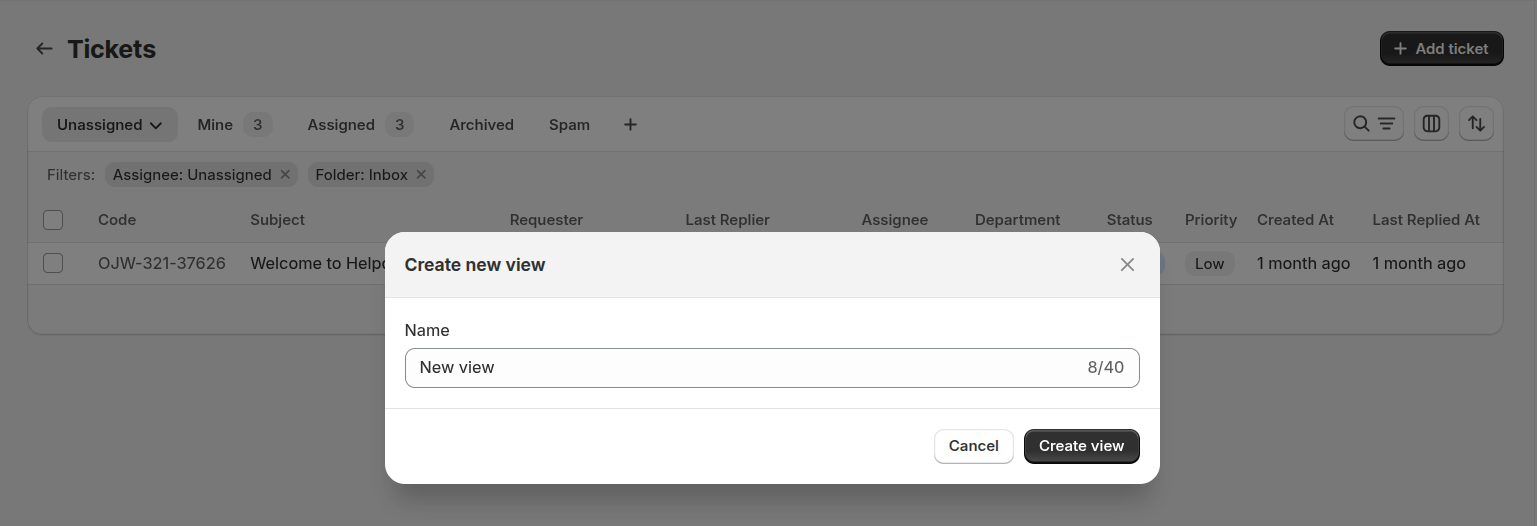
You can create your own view by clicking "+" button on the bar
Search and Filter
Search Bar: Click on search icon and type keywords to search across all ticket fields (subject, customer name, email, ticket code).
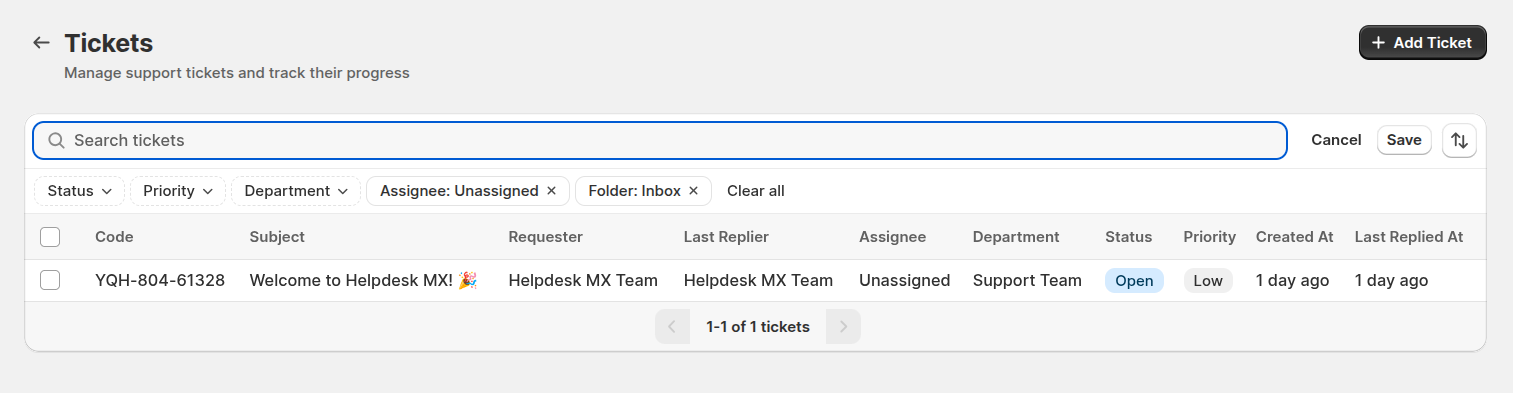
Filters: Click the filter icon to narrow down tickets by:
- Status
- Priority
- Department
- Assignee
- Folder
Edit columns
The Edit сolumns feature allows you to fully customize the ticket grid to match your workflow and preferences. Tailor your view so you see the information that matters most at a glance.
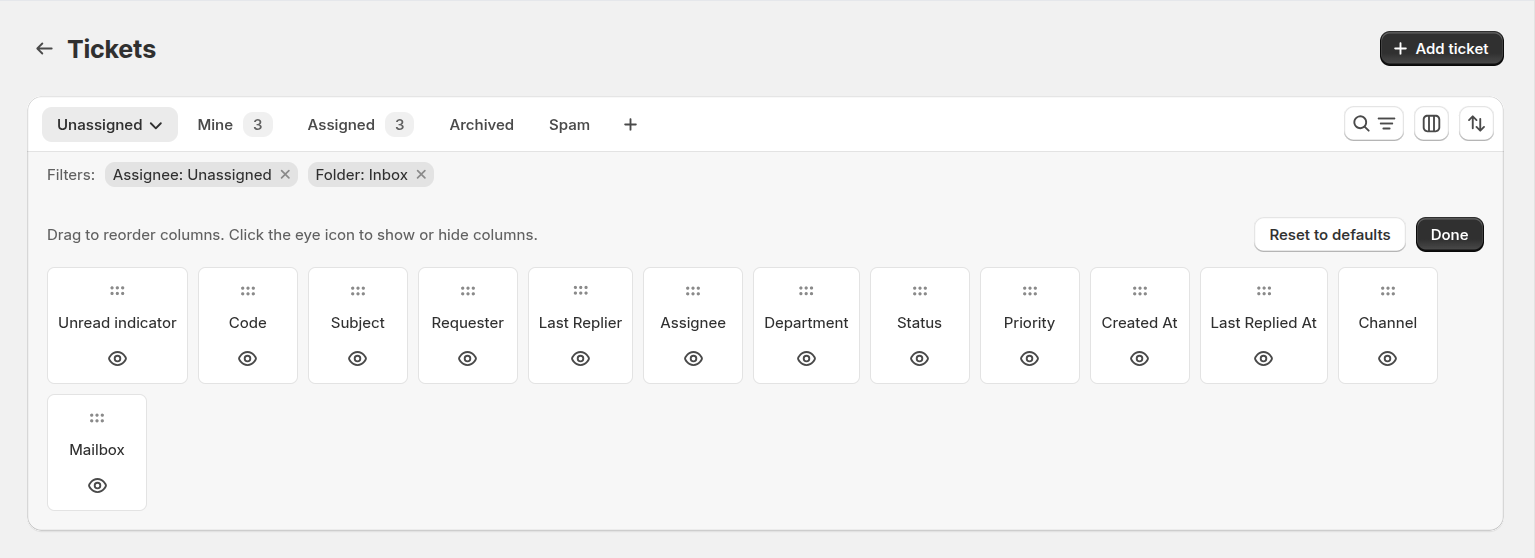
To open the column editor, click the Edit columns icon.
- Drag to reorder columns – easily rearrange the ticket grid to prioritize the most important data for your team.
- Show or hide columns – click the eye icon to toggle visibility of any column, keeping your workspace clean and focused.
Mass Actions
On the ticket grid, you can perform mass actions to efficiently manage multiple tickets at once.
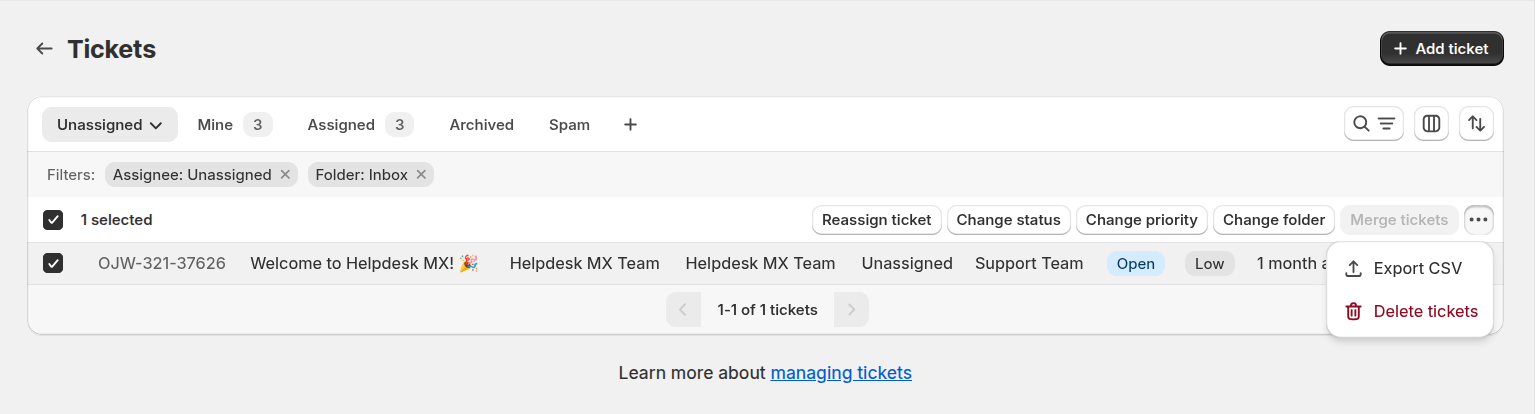
You can select several tickets and:
- reassign tickets to other support support team member
- change their status, priority or folder
- delete the selected tickets permanently
- merge the selected tickets into one ticket
- export the selected tickets to CSV
Creating a Ticket
There are two ways to create tickets in Helpdesk MX:
Automatic from Email
When a customer emails your configured support address, Helpdesk MX automatically:
- Creates a new ticket
- Extracts the subject and message
- Assigns a unique ticket code
- Notifies assigned team members (based on your automation rules)
Manual Creation
- Click Create Ticket button
- Fill in the ticket information:
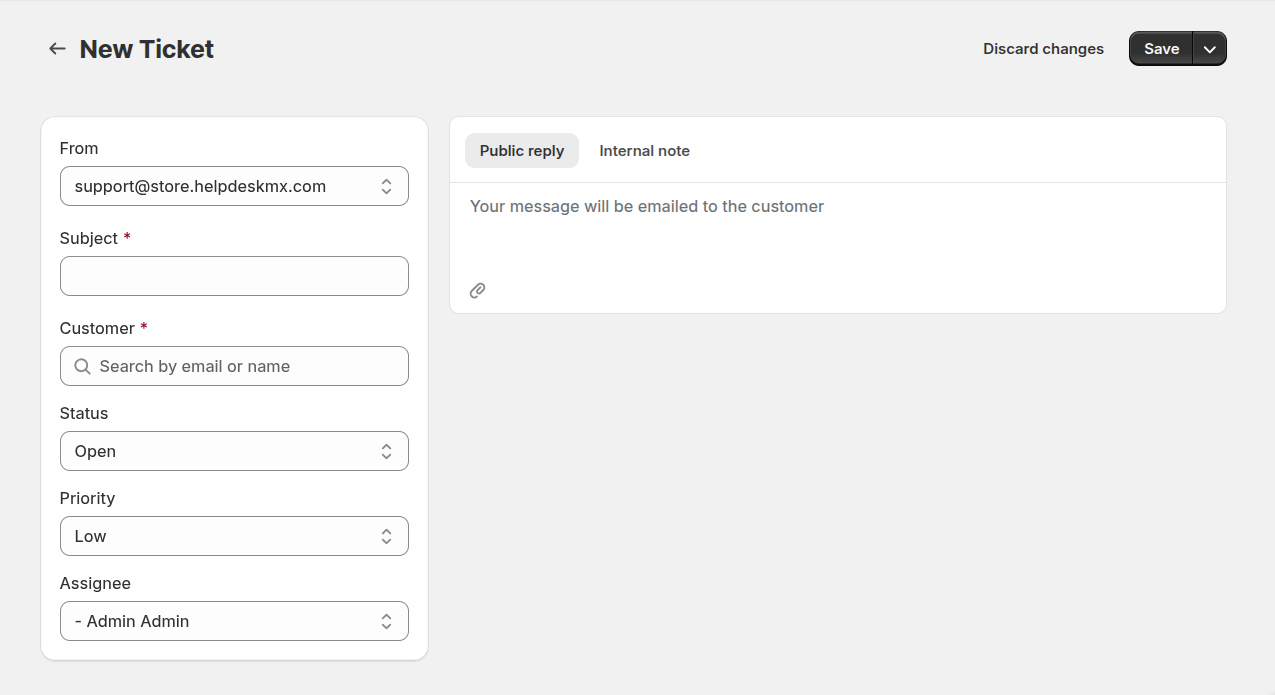
Basic Information:
- From: mailbox that will be used for this ticket
- Subject: add additional email recipients
- Customer Email: customer's email address
Ticket Properties:
- Status: select status
- Priority: choose priority level
- Assignee: assign to a team member or department
- Write a message and attach files if needed
- Click Send to create the ticket and email the customer
Viewing Ticket Details
Click any ticket to view its full details. The ticket page has three tabs:
General
The General tab is your primary workspace for handling a ticket. It combines customer information, ticket controls, and the full conversation in one place.
Basic Information:
- Customer name
- Customer email
- CC - manage CC recipients
Ticket Properties:
- Status (click to change)
- Priority (click to change)
- Assignee (click to assign or reassign)
Reply area:
- Text area for composing replies
- AI button
- Quick response button
- Attach files button
Conversation History:
- All messages in chronological order
- Shows who sent each message and when
- Displays customer messages and your team's replies
- File attachments with download links
Other tickets
The Other tickets tab shows additional tickets created by the same customer.
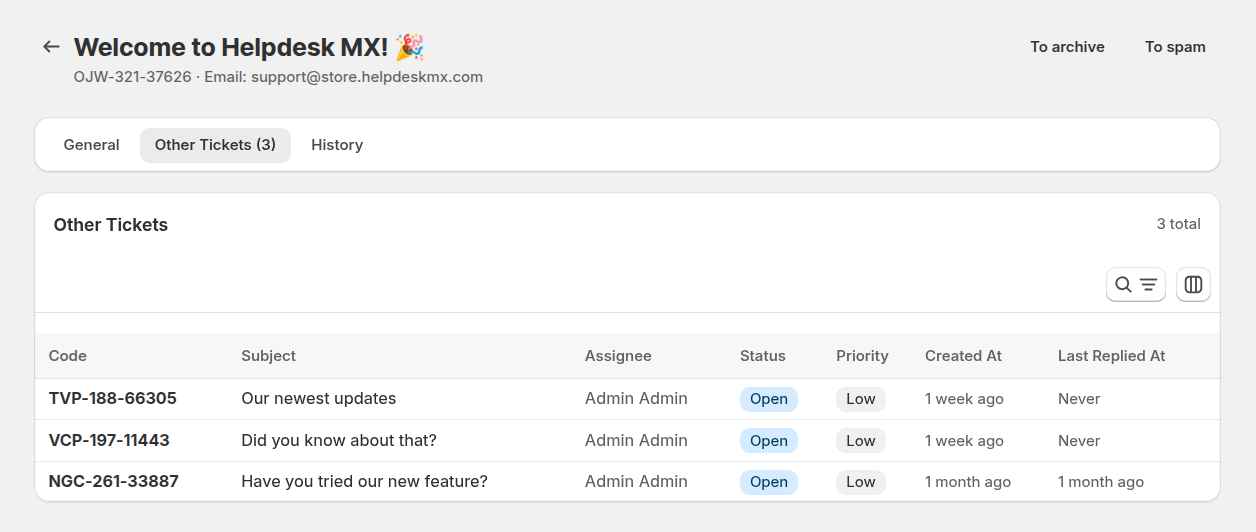
It allows agents to:
- Quickly review previous or ongoing issues.
- Understand the customer’s history and recurring problems.
- Provide more personalized and informed support.
History
The History tab shows the history of the changes in the ticket.

Replying to Tickets
To respond to a customer:
- Type your reply in the Reply Area
- Attach files if needed
- Click Send
Your reply will be emailed to the customer and added to the ticket conversation.
Reply Options:
- Send Reply: Send and return to ticket list
- Send and Stay: Send reply and remain on ticket page
Reply Tools
To speed up replies and keep communication consistent, you can use built-in reply tools:
Quick responses — insert predefined reply templates with a single click. This is ideal for frequently asked questions, standard instructions, or common follow-ups.
AI button — improve or rewrite your message using AI. To use it, select any text in the reply editor and click the AI button.
Available actions:
- Fix grammar & spelling — correct typos and improve language quality
- More friendly — make the message warmer and more conversational
- More concise — shorten the text while keeping the meaning
- More formal — adjust the tone to a professional, formal style
- Rephrase — rewrite the message with a different wording
- Expand — add more detail and explanation to the selected text
These tools help agents respond faster, maintain a consistent tone, and deliver high-quality answers with minimal effort.
Updating Ticket Information
Change Status
Click the Status field and select:
- Open: New or active ticket
- In Progress: Currently being worked on
- Closed: Issue resolved
Change Priority
Click the Priority field to set urgency:
- High: Urgent, needs immediate attention
- Medium: Standard request
- Low: Non-urgent inquiry
Assign Ticket
Click the Assignee field to:
- Assign to a specific team member
- Assign to a department
Ticket Actions
At the top of each ticket, you have these actions:
Back to Tickets: Return to the ticket list
Action Menu (dropdown):
- Save: Save changes and return to list
- Save and Stay: Save without leaving the page
- To Archive: archive the ticket
- To Spam: mark as spam
- To Inbox: move ticket to inbox folder (only for ticket that are not in inbox folder)